Where it works
Medium and long sightlines let the thermal sights, laser rangefinder and DM53 work together. Choose a ridge with a reverse slope you can back down after firing.
 THUNDERHQ
Ground RB / Vehicle Database / Profile
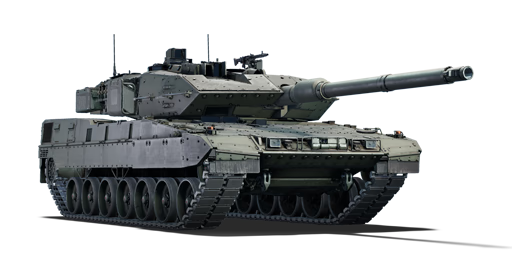
Germany · Medium tank · Rank 8
These are archived ratings; check the game for current values. The history below shows recorded ratings and announced changes.
Use the 2A7V to hold a ridge or a long firing lane, then move when the enemy starts aiming at your position. Its frontal protection gives you room to fight; the lower hull still needs cover.
Medium and long sightlines let the thermal sights, laser rangefinder and DM53 work together. Choose a ridge with a reverse slope you can back down after firing.
Tight streets expose the lower plate and sides. The added armor also makes this less agile than earlier Leopards. Take a supported route through town instead of racing light tanks to a corner.
Take a hull-down lane overlooking an approach or capture route. Range a likely crossing before an enemy appears. Favor a clear, aimed shot over an early shot into a turret cheek.
Engage the enemy that can shoot your exposed hull first. If a frontal knockout is uncertain, a clear shot at the gun can buy time to withdraw. Avoid switching to a distant target while a nearby tank controls your escape.
When a teammate holds an enemy’s attention, shift to a nearby lane for a side shot. Keep the hull facing the likely threat during the move; a wide solo flank throws away the frontal protection you paid for in weight.
Do not carry 37 rounds for a short opening fight, crest until the lower plate is visible, or repeat the same peek after taking a hit. After firing, use the reverse gear; after being located, change the angle.
The turret cheeks and reinforced upper front hull are the areas to present toward the threat. Composite armor and spall liners improve protection, but a penetrating hit can still disable the gun or crew.
Hide the lower front plate. The mantlet and turret ring remain vulnerable, and side hits can reach crew or ammunition. An empty hull rack removes one detonation risk; it does not make the hull safe.
Use the gun depression to fire over a crest with the hull concealed. Stop below the skyline, expose only enough to aim, then reverse back down. Check the slope before committing: depression is restricted over the engine deck.
Keep the frontal arc toward the shooter. Heavy angling exposes the weaker side rather than providing a dependable defense against modern darts. Use smoke to cover a retreat into solid cover, not to remain in the same firing position.
Protection depends on the incoming round, angle and impact point. Check a specific matchup in the in-game Protection Analysis before relying on an armor zone.
Make this your main anti-tank round once unlocked. Aim at a weak point or through the crew compartment; a strong dart still needs a useful shot path.
Use this against armored targets while researching DM53. Look for exposed hulls or side shots when a frontal target is too well protected.
Carry a small reserve for exposed crews and lightly armored vehicles. Use it when the explosive effect offers more than a narrow dart hit. Keep APFSDS ready when enemy tanks are nearby.
A situational option against thin armor or open tops. Avoid frontal shots into composite armor or ERA, and avoid firing through fences or other obstacles that can trigger the shell early.
Start with 14 DM53 and 2 DM11. Before DM53 is unlocked, use DM43 for the anti-tank portion. The recommendation is a total load, including the chambered round.
Sixteen rounds keep the load in the breech and turret ready rack, leaving the vulnerable hull rack empty. More rounds extend a long sortie but put ammunition back in the hull. Plan a capture-point resupply rather than filling every rack by default.
The reverse speed makes short exposures practical: fire from a ridge, then back into cover without turning the hull. Choose the escape route before taking the shot.
Added armor costs mobility compared with earlier Leopards. Flank through covered ground after the opening rush, and reposition before a lane collapses. Top speed is not a promise of acceleration or cross-country pace.
Scan at low magnification, then zoom to place the shot. Thermals help find a target; check its outline and the intervening cover before firing.
Range before exposing the hull. Use the commander’s sight to check a second lane, then return to the gunner’s sight to fire. Commander Override can keep the gun in action if the gunner is knocked out.
The stabilized gun supports controlled shots after moving, but the reload leaves an opening for a return shot. Back into cover while loading. The machine guns can deal with exposed crews; they are not a substitute for the main gun against protected light vehicles.
| Date | Game mode | Battle rating |
|---|---|---|
| No confirmed battle rating changes are recorded. | ||
| Date / source | Arcade | Realistic | Simulator |
|---|---|---|---|
| October 7, 2026Site profile snapshot | 12.7 | 12.7 | 12.7 |
| October 26, 2025Observed · Wiki archive ↗ | 12.7 | 12.7 | 12.7 |
| November 26, 2024Observed · Wiki archive ↗ | 12.0 | 12.0 | 12.0 |
Vehicle data checked October 21, 2026. Crew optics checked October 22, 2026. Speeds use Realistic Battles values. Reload depends on crew skills and qualification; damage can reduce performance. Unknown equipment is not a confirmed absence.
Leopard 2A7V vehicle guide · 0 comments